… [Trackback]
[…] Read More Information here to that Topic: blog.neterra.cloud/en/git-github/ […]

Git Goals and Objectives
What you get from VERSION CONTROL SYSTEM
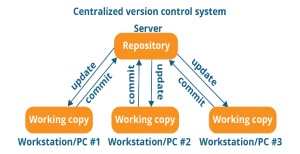
Version Control is the management of changes to documents, computer program, large websites and other collections of information.

The most widely used modern version control system in the world today is Git. Git is a mature, actively maintained open source project originally developed in 2005 by Linus Torvalds, the famous creator of the Linux operating system kernel. A staggering number of software projects rely on Git for version control, including commercial and open-source projects.
Source: https://gdgucc.blogspot.com/2017/10/what-is-git.html
Design philosophy:
We’ve established that Git is a version control system, similar to but better than the many alternatives available. So, what makes GitHub so special? Git is a command-line tool. However, the center around which all Git-related things revolve is the hub – GitHub.com – where developers store their projects and networks with like-minded people.
A repository (usually abbreviated to “repo”) is a location where all the files for a particular project are stored. Each project has its own repo, and you can access it with a unique URL.
Source: https://www.howtogeek.com/180167/htg-explains-what-is-github-and-what-do-geeks-use-it-for/
The first step is to download GIT from the link below, it is available for all operation systems: https://git-scm.com/downloads
$ git config --global user.name “Your Name Here”
$ git config --global user.email “email@example.com”
$ git config --list (show all properties)
$ git help (example: $ git help add)
Enter the folder you want to use for the project and open a terminal on it
$ git init
Commiting the first file:
$ git status
$ git add file.txt | $ git add . (add all files you made changes on)
$ git commit –m “a message with which you want to commit the file”
$ git push origin master (explanation after)
If you want to see the changes from a certain user:
$ git log --author ”name”
Version Control system
Verify changes in GIT
$ git diff
Compare staged with repo in GIT
$git diff --staged
Delete a file
$git rm file.txt
GIT – DVCS is a tool
GITHUB is
To create a central repository:
$ git pull origin master
$ git clone https://github.com/user/repo
$ git push origin master
A branch in GIT is a pointer to commit. To create a new branch we use the following command:
$ git branch
$ git branch development
$ git checkout development (to switch branches)
$ git branch (to check in which branch you are)
Get to the branch you want to merge the changes in (for example, from development to master)
$ git checkout master
$ git merge development
$ git push origin master (sync with github)
$ git reset HEAD filename (HEAD - alias for the current branch ex. $git reset master|development filename)
$ git reset HEAD~ filename (HEAD~ last commit reverted | HEAD~5 delete the last 5 commits from the history)
The prefered command for many cases is:
$ git revert commit_id
You can copy the commit_id from
$ git log
$ git reset HEAD filename
$ git checkout --filename
$ git rm –rf directory\ (r – recursive, f – force, all in the directory)
$ git commit –m “message” | $ git push origin master
$ git mv filename new_filename
$ git mv filename new_dir_path
Command to verify last commit
$ git log
Get GIT abbrev commit hash
$ git log --abbrev --log
GIT oneline commit
$ git log --oneline --graph --decorate
Logs that have been executed the last day or the last 5 days
$ git log --since=“5 days ago”
$ git show commit_id
$ git help log
GIT alias is a short way to display a results from a long command. In order to add an alias we need to add the alias at GIT global config.
$ git config --global “long_command”
Example:
$ git config global alias.history “log --all --graph --decorate --oneline”
or:
$ nano ~/gitconfig
$ nano .gitignore
GIT ignore pattern example:
# exclude everything except directory
/*
!/dir
/dir/*
!/dir/bar
Working directory and staging directory
$ git diff
$ git diff filename
Compare working directory and repository
$ git diff HEAD (compare working directory with the last commit)
$ git diff HEAD filename
Staging area and repository
$ git diff --staged HEAD
$ git diff --staged HEAD filename
Compare commits in GIT
$ git diff commit_it commit_it
$ git diff HEAD HEAD^ (compare the last commit and the commit previews last head -1)
Verify branch
$ git branch -a
Switch GIT branches
$ git checkout
Rename branch
$ git branch -m
Delete branch
$ git branch -d (before deleting a branch, switch to another)
$ git merge
Example (first move to master):
$ git merge development
GIT merge to create a new “merge commit” in the development branch that ties together the histories of both branches, giving you a branch structure that looks like a graph.
Impact: in this case, the development branch will have an extraneous merge commit every time you need to incorporate upstream changes. If the master is very active this can pollute your development branch history.
As an alternative to merging, you can rebase the development branch into the master branch
$ git checkout development_branch
$ git rebase master
This moves the entire development branch to begin at the top of the master branch, effectively incorporating all of the new commits in the master. Instead of using merge commit, re-base re-write the project history by creating brand new commits for each commit in the original branch.
Benefits: You get much cleaner project history. It also results in a perfectly linear project history.
When you create a stash, you are saving uncommitted changes so that you can work on other things without losing your changes.
Example: You are working on a function, but your boss wants you to do something immediately and you need to change branches. Your code is not ready for commitment and you do not want to lose your work as well… so you stash J.
$ git stash save “message of what you were doing”
$ git stash list (list the changes made on stash with their id)
In order to work again on the stashed file:
$ git stash apply stash_id (example: stash@{1})
When you’re ready to finalize these saved changes, you have two options: apply or pop.
Apply will take the stashed changes, apply them to your working directory, and keep the changes saved as a stash.
$ git stash apply stash@{0}
Pop will do the exact same thing for the first two steps, but it will permanently delete the stash.
$ git stash pop (will drag the very first stash on the stash list)
Source: https://dzone.com/articles/learning-git-what-is-stashing
Discard the stashed changes:
$ git stash drop stash@{0}
Discard all stashed changes:
$ git stash clear
… [Trackback]
[…] Read More Information here to that Topic: blog.neterra.cloud/en/git-github/ […]
… [Trackback]
[…] Find More Information here on that Topic: blog.neterra.cloud/en/git-github/ […]
… [Trackback]
[…] Here you can find 86735 additional Information to that Topic: blog.neterra.cloud/en/git-github/ […]
… [Trackback]
[…] Read More Information here on that Topic: blog.neterra.cloud/en/git-github/ […]
… [Trackback]
[…] Find More Info here to that Topic: blog.neterra.cloud/en/git-github/ […]
… [Trackback]
[…] Here you will find 98610 additional Information on that Topic: blog.neterra.cloud/en/git-github/ […]
… [Trackback]
[…] Info on that Topic: blog.neterra.cloud/en/git-github/ […]
… [Trackback]
[…] Read More here to that Topic: blog.neterra.cloud/en/git-github/ […]
… [Trackback]
[…] Find More Info here to that Topic: blog.neterra.cloud/en/git-github/ […]
… [Trackback]
[…] Read More Info here on that Topic: blog.neterra.cloud/en/git-github/ […]
… [Trackback]
[…] There you can find 92500 additional Info to that Topic: blog.neterra.cloud/en/git-github/ […]
… [Trackback]
[…] There you will find 96975 more Information to that Topic: blog.neterra.cloud/en/git-github/ […]
… [Trackback]
[…] Find More Info here to that Topic: blog.neterra.cloud/en/git-github/ […]